Saturday, March 24, 2012

Sleek Eyeshadow Palette in Storm

I don't normally wear eyeshadow unless there's an event. It's too leychey (tiresome) to put on everyday. But here's one palette that I really like, that provides colours for both a neutral everyday look as well as a more intense night time look. It's the Sleek Eyeshadow Palette in Storm.


It's a beautiful sleek (haha pun) palette measuring 14 x 7.3 x 1cm (machiam handphone dimensions). Each colour measures about 2cm in diameter, which is a decent size. The palette snaps shut securely, and doesn't feel like it's made of super cheap plastic despite its super cheap price of SGD$20. (not affiliated, but you can get it here.)  That's like $1.70 per colour!!!! (On a side note, it's only GBP6 so we're already paying a premium and it's still cheap) I feel super auntie with all this price details but SUPER GOOD VALUE YO. It also comes with a full sized mirror where even if you have a big face like me, confirm can see entire face, as well as a pretty good quality applicator which I quite like using.


Above are colour swatches on paper (indoor light) ,in pan (sunlight) and on skin (indoor light with no primer). I tried to show how reflective some of the colours are on the paper, hence some do seem quite bright. The formulations are super smooth and buttery and pigmented. Only the matte shades (3, 11, 12) lack pigmentation. Another good swatch would be below, showing the reflective qualities of this palette in most awesome lighting.


1: Antique gold colour with tiny tiny tiny glitters. Satin finish. Colour is true to pan. I super super super super love this shade.

2. Champagne gold colour, almost comes off white. Super reflective. Awesome for highlighting face, or the inner corner of the eyes.

3. Matte milk coffee shade. Rather blah as it's lighter/same colour as my skin tone. Fairer skins will like this as a neutral base colour.

4. True gold. Applies to almost a foil effect because it's soooo reflective. Another one of my favourites in this palette.

5. Golden pink colour. Super smooth shimmery satin finish.

6. Deep maroon colour. Satin finish. Comes off on skin almost like a red tinged copper shade, but when packed on, the purplish hues emerge and is quite lovely.

7. Super intense dark copper/ brown with a satin finish. 5,6,7 almost seem like a nice gradient of intensifying colour. I think this shade would be great for outer corner shades or even as an eyeliner.

8. Greyish dark ice blue is probably the best description I can give this colour. I love how it looks like in the pan. On skin, the base colour is the greyish dark blue, but the sheen is silver. So intense. Slightly crumbly formulation.

9. Dark ivy green. In pan, this colour looks like a really intense deep deep green. I had high hopes for this colour. However when swatched, it comes out almost like a greyish kind of black with a satin finish. The green is barely visible. Still very pigmented though. Formula is also crumbly.

10. Dark electric blue with tiny blue, purple and silver glitters. Fans of blue or brighter colours will like this one. It is quite an awesome and killer shade, but I prefer neutrals and haven't really figured out how to wear this one yet. Formula is crumbly.

11. Matte dark chocolate brown. Not very pigmented but can be layered for intensity. Pretty normal. Can be used for eyebrows.

12. Matte black. Also not very pigmented. Can be worked into some of the other colours to tone/darken them however.


My overall thoughts on this palette:

Pros:

  • Packaging is very sleek, sturdy and compact. I really like the mirror and applicator.
  • Value for money
  • Glitter shades are phenomenal. Super super pigmented, not frosty or chalky, and I love how reflective yet subtle on the eyes these shades are.
  • Formulation is soft and smooth
  • Good mixture of neutral, light and dark shades to play with
  • Colours last on me

Cons:
  • Matte shades could be more pigmented, the ones included are good colour choices, but still quite meh
  • Only 3 matte shades
  • not locally available in stores to try
  • shades 8,9,10 are crumbly (if I were nitpicking)

2 looks that I did, 1 neutral and 1 smokey eye (?). 


2 champange gold colour : all over eyelid, as well as inner corner of eye
4 true gold colour : concentrated under the double eyelid line
6 deep maroon colour : concentrated at the outer corner to give depth
5 golden pink colour : to blend 2 and 4 together, also to reflect light and add dimension


1 antique gold colour : all over eyelid
2 champagne gold colour : inner corner of eye
9 dark ivy green : concentrated under double eyelid line
7 intense dark copper : drawn in a > shape into the crease line to give the fold more depth.. blend this shape really well.

I hope this review is comprehensive enough! I apologise in advance for not doing a look for monolids, but that's because I don't have monolids (just uneven eyelids) and thus do not know how to! 

Base Routine


FOTD? I was experimenting with a new way to achieve a lighter base routine but still achieve the maximum coverage. Today I stumbled upon this application which though quite time consuming, I like the way it looks and feels.

I will be posting up images from the web as I'm too lazy to take my own.

Prep:
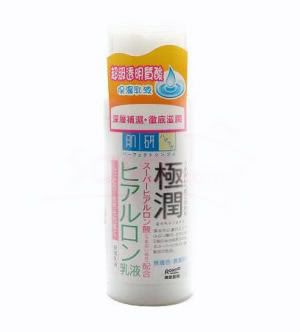
Hada Labo Lotion
Works as a toner, also quite moisturizing and light. For me it's not moisturizing enough, that's why I top it off with another moisturizer.

Garnier Whiten & Even Moisturizing Cream spf 17/pa++
Gives an instant brightening effect, especially for paler girls. For me it makes my face quite white. However I think that this moisturizer does work quite well for scars and pigmentation, that's why I use it.

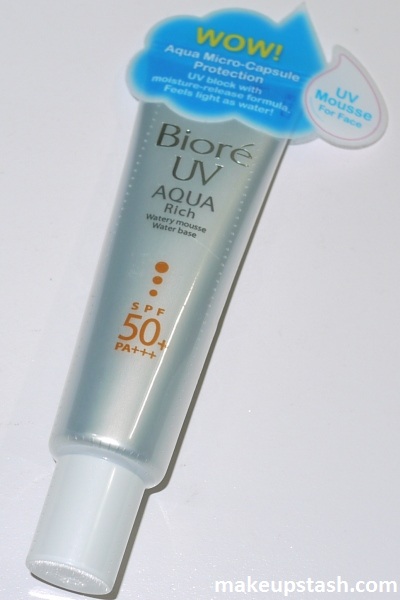
Biore UV Aqua Rich Watery Mousse Water Base spf 50+/pa+++ (need so many + a not...)


Sunblock. My mom always told me to use sunblock. I never listened. Now I have pigmentation and am very sad. Love this sunblock. Absolutely love the texture. Super light!

Olivia by CCS eco Eye Cream with Organic Olive Oil (bought in Sweden)
Bought this in Sweden because I had no eye cream and I was developing wrinkles under my eyes. This was the cheapest at their drug store because they have 25% (yeah you read that right) tax on all skincare. Quite a light and nice eye cream, doesn't do much for the wrinkles but decent for day time use. Use a light eye cream and not a heavy one because eye creams are what causes your concealer to move and mascara/eyeliner to smudge.


Base:

Skin79 Super+ Beblesh Balm
1. Use Skin79 BB Cream as a base/primer. I use this to cover up my pores to give a smoother surface to work on. It also provides decent coverage for areas that are red.

Kevyn Aucoin Sensual Skin Enhancer

2. This is a product that can be used as a foundation, however, I haven't had it long enough to find out how to work with it as it is AMAZINGLY pigmented. It is also slightly darker than my skin tone (matches my neck but my natural face is alot lighter than my neck so I cannot stand it being so dark), and since it's so pigmented it looks unnatural. In any case, this has no silicones or fillers so when on the skin it looks like skin. I use this to conceal any blemishes or pigmentation. If you do not own this, use a concealer that is slightly darker than your skin tone to conceal, then blend the edges out very well.

Kate Covering Concealer for Under Eyes

3. Use a peach concealer for under eye rings. Kate Covering Concealer is not bad, doesn't really crease for me. Squeeze some onto hand and slowly use a finger to dab it under the eyes. Work in thin layers so that it won't crease rather than putting on a lot at once and blending out. Can also be used to brighten up the area under eye/eyebags for a Kim Kardashian look.
Ginvera Green Tea Nude Cover BB Cream

4. Face should look slightly odd now, with patches of dark concealer and peach concealer. No fear, use Ginvera Green Tea BB Cream and dab over the dark spots, blending it into the rest of the face. Also put some on top of (if necessary) or around the peach areas and blend. 

Rest of face:

e.l.f All Over Colour Stick in Spotlight
I use this as a highlighter for my nose. Cream products generally work well with a cream base. Do not ever use this on powder base, will cause powder to ball up/shift.

NYX Rouge Cream Blush in Natural
Mentioned in review below.
L'oreal Super Liner 
Got this as a free gift and it works quite well. I use this to line my eyelid. Using another lighter pencil in black, lightly line the waterline. Not too intense. Then using an angled brush/flat brush, get a brown eyeshadow (or just use eyebrow pencil haha) to fill in the little corner space under the outer corner of the eye. This will really elongate the eye. Will do a proper tutorial soon.

Finish off with a lipbalm/lip colour if you like. I use the EOS lipbalm, very minty. I practically eat it. 

This base procedure does take quite long if you have many spots/scars like me because it's based on concealing mostly the spots and keeping the rest of the face relatively free of products. I really like it because I don't get the unnatural look that comes with using heavy coverage foundations. I also prefer this over powders because for some reason, I always picture powder particles army crawling their way into my big pores and refusing to get out. If you haven't already realized, the above routine is ALL cream/liquidy products. I hope this helps someone who needs as much coverage as I do and still wants to look normal, but if not, hope it helps anyway!

Oh, DO NOT take any pictures with this routine on. YOU WILL HAVE A WHITE FACE. There are 4 products in this routine that have spf. One of them being spf 50 with many + signs. Yes I am that paranoid. Okay no I'm not, it just so happens. 

If I am not clear enough, here are the tutorials that I have adapted my own routine from. I really like the 2nd girl!


Enjoy!


NYX Rouge Cream Blush (Natural) Review

 It's strange that I love this blush yet I don't wear it often. I have a love hate relationships with cream blushes. I think I love them, especially for the finish that I get, but then I hate attempting to wear them because powder is so much easier to use. Owell.  This is the NYX Rouge Cream Blush in CB02 Natural.

This is the only NYX cream blush that I own, so I cannot give a comparison to the other colours.


Its packaging is very simple, but feels like super cheap, light plastic. I guess, at SGD$7 (when I bought, think it's $9 now) I can't expect too much. Snaps open and close, nothing special nor hard to use. As can be seen from my....usage (pardon the disgustingly used picture), I used to try to blend it out with my fingers. This method is quite easy, especially for people with already good skin. 

As for me, I have an unfortunate has-been-cyst that has scarred and is now a raised bump on my cheek (sigh, don't know when it'll ever be gone), hence blending with my fingers for any form of cheek product in cream/liquid form just wipes away my concealer/foundation. I haven't quite found a way around the movement of my base and am quite annoyed. Nonetheless, with this blush, stippling works wonders in blending it out with minimal movement of base. 

I still have't gotten the hang of getting the right amount out with my stippling brush. Whatever it is, DO NOT just bang your brush in. Lightly dip some bristles. With 3.5g of product, this pot will last a lifetime, considering that the barest of amounts is used each time. I don't see myself ever finishing this.

The formulation of the cream is extremely creamy and soft in pan, especially in this Singapore heat. I live with my aircondition on, and it still does not solidify. Anything dents it. Because of its creaminess, it's a dream to blend. Super easy.


It is a very very very pigmented peachy pink colour with no shimmer. Natural as a name is quite apt I feel. 

Left:  me taking way to much product with my fingers
Middle: me trying to blend the rest of the product out aka heavy+blended application
Right: whatever was left after aka light+blended application.

Formulation dries to a semi matte finish with a sheen which I love. Done right, it really brightens the face up without looking oily, and no highlighter is needed because of its nice finish. Can be used under a regular powder blush to intensify colour. Not that I find the need to. 

I know I make this blush sound incredibly hard to use, but really it's very easy with a stippling brush. 


Here's me, just managing to get the barest of amount on my cheeks. Front view, the sheen of the blush is not obvious, but from the side, the blush catches the light. But since I don't like my side profile... You just have to trust me.

Wearing time is about 4-6 hours, not the best. I don't touch up my blush though, I find that even if it fades it'll still last a normal work day, so it works by me!

Summary:

Pros:

  • Super pigmented
  • Nice, natural colour
  • semi matte finish with a sheen
  • very creamy and blends easily
  • cheap

Cons:
  • Too pigmented makes it hard to use
  • does not last very long
  • flimsy cheap packaging